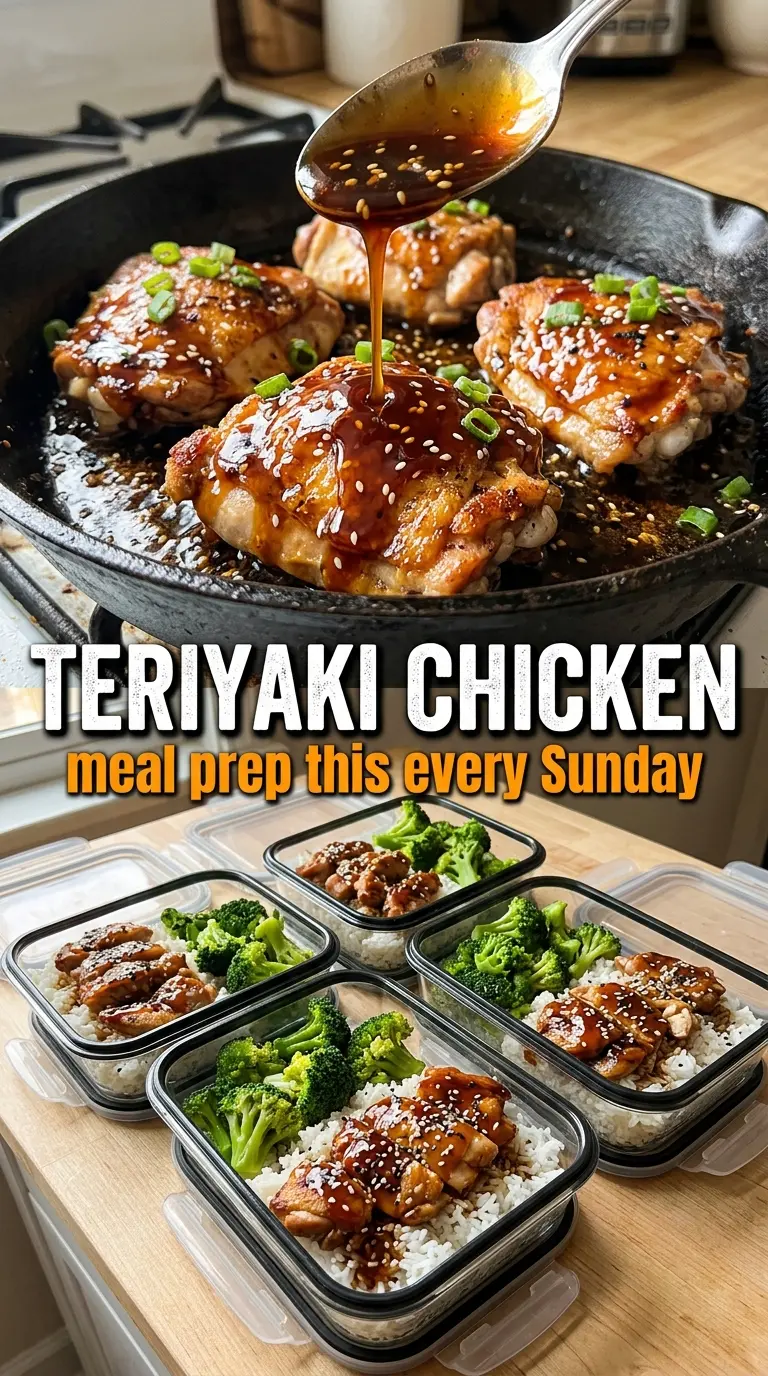
Sticky teriyaki chicken earns its place in the weeknight rotation because it hits that sweet spot between fast and worth lingering over. The chicken gets bronzed in the pan, then coated in a glossy sauce that clings instead of pooling at the bottom of the plate. When it’s done right, every bite has a little char at the edges, a little sweetness in the center, and enough salt and ginger to keep the whole thing from tasting flat.
The trick here is splitting the sauce before the chicken goes in. Half becomes the marinade, and the other half stays clean for the pan, which means you get deep flavor without risking undercooked sauce. Brown sugar and honey give the glaze its lacquered finish, while cornstarch turns the reserved liquid into something thick enough to coat the chicken instead of washing right off. I use thighs because they stay juicy and take a hard sear without drying out.
Below you’ll find the little timing details that matter, plus a few swaps that still keep the sauce balanced and glossy. If teriyaki has ever turned out thin, burnt, or oddly one-note, this version fixes all three.
The sauce thickened up into that shiny takeout-style glaze, and the chicken stayed juicy even after I let it sit a few minutes before serving. I also liked that the garlic and ginger stayed noticeable without taking over.
Save this teriyaki chicken for the nights when you want that dark, glossy sauce and caramelized edges without ordering takeout.
The Reason the Sauce Sticks Instead of Sliding Off
Most teriyaki chicken goes wrong in one of two places: the marinade gets used as-is, or the pan gets too hot once the sugar hits it. This version avoids both problems. Half the sauce seasons the chicken, and the other half gets a clean finish in the skillet, where the cornstarch slurry turns it into a coating sauce instead of a thin glaze that runs into the rice.
Chicken thighs give you some insurance here. They can handle a proper sear without drying out, and that extra fat helps the sauce cling to the surface instead of looking patchy. If you use chicken breasts, the method still works, but you’ll need to pull them as soon as they hit 165°F or they’ll start to go stringy under the glaze.
- The split sauce keeps the marinade from becoming food-safety trouble and gives you a fresh, glossy finish at the end.
- Brown sugar and honey create the sticky lacquer, but they also burn fast, so the pan should stay at medium-high, not screaming hot.
- Cornstarch slurry thickens quickly once the sauce simmers; if it looks loose at first, give it those extra 2 to 3 minutes.
- Thighs over breasts means better browning and a little more forgiveness if the pan runs hot.
What Each Ingredient Is Doing in the Pan
- Soy sauce brings the salt and the deep savory backbone. Regular soy sauce works best here; low-sodium is fine if that’s what you keep on hand, but the sauce may need a little extra simmer time to taste full.
- Brown sugar and honey build the sticky finish. Brown sugar gives the sauce its caramel note, while honey helps it cling and shine once it reduces.
- Mirin or rice vinegar gives the sauce lift. Mirin tastes softer and rounder; rice vinegar is sharper, so use it if you want a slightly brighter edge.
- Sake or dry sherry adds a restaurant-style depth, but the chicken still works without it. If you skip it, add a small splash of water so the marinade isn’t overly concentrated.
- Garlic and ginger should be fresh, not powdered, if you want the sauce to taste alive instead of flat. Grate the ginger finely so it melts into the glaze.
- Cornstarch slurry is what turns the reserved sauce into a proper coating. Mix it with cold water first or you’ll get little paste lumps that never smooth out.
Getting the Sear Before the Glaze Goes On
Marinate Without Soaking the Chicken
Whisk the soy sauce, brown sugar, honey, mirin, sake, garlic, and ginger until the sugar starts dissolving, then reserve half before the chicken goes into the rest. That clean split matters because the reserved sauce needs to go straight from bowl to pan later. Twenty minutes is enough to season the chicken and keep the texture pleasant; much longer and the salt starts working the meat too hard.
Brown the Thighs, Don’t Steam Them
Heat the oil in a large skillet over medium-high heat until it shimmers, then lay the chicken in without crowding the pan. You want a steady sizzle, not a loud crackle that scorches the sugar from the marinade. Let the first side develop a dark golden crust before turning; if the chicken sticks hard, it usually needs another minute rather than a forceful flip.
Thicken the Sauce in the Pan
Once the chicken comes out, pour in the reserved marinade and bring it to a simmer. Stir in the cornstarch slurry and keep it moving as it thickens into a glossy sauce that lightly coats the back of a spoon. If it stays thin, the pan probably didn’t come back to a real simmer after the chicken was removed, so give it another minute before deciding it needs more cornstarch.
Coat and Finish Fast
Return the chicken to the skillet and turn it through the sauce until every piece is lacquered. The sauce should cling in a thick layer and leave shiny streaks in the pan, not puddle underneath the chicken. Serve it right away over hot rice so the glaze stays glossy instead of tightening into a tacky shell.
How to Adapt This Teriyaki Chicken Without Losing the Gloss
Gluten-Free Version
Use tamari instead of soy sauce and check that your mirin or vinegar is labeled gluten-free. The sauce will stay glossy and balanced, and the finished flavor stays close enough that no one at the table will feel shortchanged.
Less-Sweet Teriyaki
Cut the brown sugar down to 2 tablespoons and keep the honey in place. You’ll lose a little of the sticky takeout-style sheen, but the sauce will taste cleaner and let the soy, garlic, and ginger stand out more.
Chicken Breast Swap
Use sliced boneless breasts and shorten the pan time, since they dry out faster than thighs. The glaze still clings well, but the meat won’t be quite as juicy or forgiving, so pull it the moment it reaches 165°F.
Storage and Reheating
- Refrigerator: Keeps for 3 to 4 days. The sauce thickens as it chills, which is normal.
- Freezer: Freezes well for up to 2 months, though the glaze may loosen a little after thawing. Cool it completely first and store it with plenty of sauce so the chicken doesn’t dry out.
- Reheating: Warm it gently in a covered skillet over low heat with a splash of water to loosen the sauce. Microwaving on high can make the chicken rubbery and can push the sugar in the glaze past the point where it tastes fresh.
Questions I Get Asked About This Teriyaki Chicken

Teriyaki Chicken
Ingredients
Equipment
Method
- Whisk soy sauce, brown sugar, honey, mirin, sake, garlic, and ginger until smooth, then reserve half for the sauce. Add the chicken to the remaining half, cover, and marinate for 20 minutes.
- Heat vegetable oil in a large skillet over medium-high heat until shimmering. Cook the marinated chicken for 5-6 minutes per side until caramelized, with dark amber blistered edges, and the internal temperature reaches 165°F, then remove.
- Pour the reserved marinade into the pan and bring it to a simmer. Stir in the cornstarch slurry and cook for 2-3 minutes until thick and glossy.
- Return the chicken to the pan and toss/turn to coat in the teriyaki sauce until sticky and evenly glazed. Serve over steamed rice, drizzle with any extra sauce, and garnish with sesame seeds and sliced green onions.