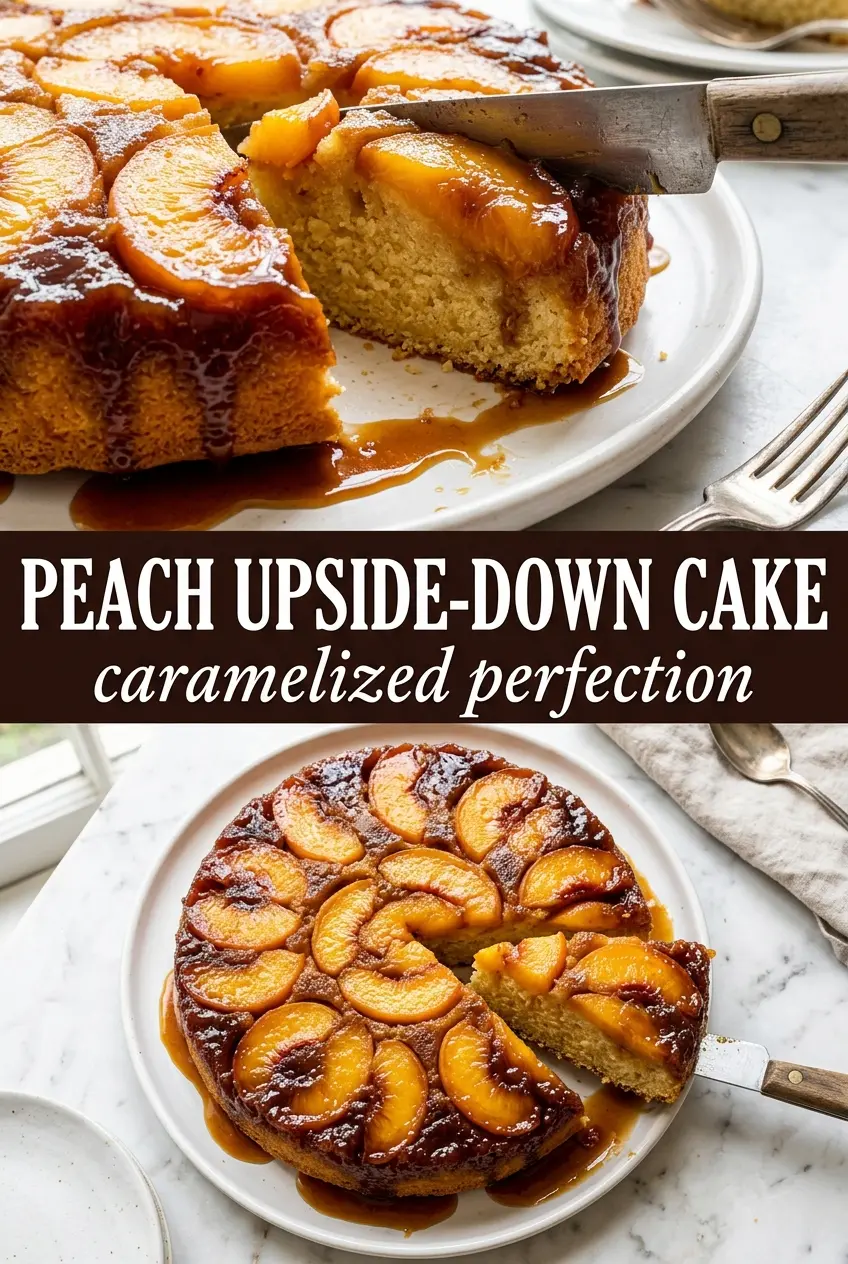
Peach upside-down cake is the kind of dessert that looks like you worked much harder than you did. The top turns into a glossy layer of caramelized peaches and brown sugar, and the cake underneath stays tender, buttery, and just sturdy enough to hold the fruit when you flip it. When it comes out right, the first slice slides cleanly and the peach juices soak into the crumb in the best possible way.
What makes this version work is the balance between the topping and the batter. The butter and brown sugar melt together first, which gives the peaches a caramel base instead of a soupy one, and the cinnamon keeps the fruit from tasting flat. The cake itself is kept simple on purpose: enough structure to support the fruit, enough fat to stay moist, and just enough vanilla to round everything out.
Below, I’ll walk through the part that matters most: how long to let it rest before flipping, how to keep the peach pattern intact, and when sour cream gives you a richer crumb than milk.
The caramel settled into a gorgeous glaze and the peaches stayed in place when I flipped it at 10 minutes. My mom asked for the recipe before dessert was even finished.
Love the glossy caramelized peach topping? Save this peach upside-down cake for the next time you want a dramatic dessert with a moist crumb and a clean flip.
The Flip Only Works If the Topping Sets First
The biggest mistake with upside-down cake is rushing the inversion. If you turn it out too soon, the caramel is still loose and the peach layer slides; wait too long and the sugar firms up and sticks to the pan. That ten-minute rest is the sweet spot, when the cake has enough structure to hold together but the topping is still warm and fluid enough to release cleanly.
The other part that matters is the peach layer itself. Overlapping slices create a solid fruit cap, but they also need enough space for steam to escape, or the topping turns watery instead of glossy. A cast iron skillet gives the best edge caramelization, but a 9-inch cake pan works fine if it’s well coated and the butter is fully melted before the sugar goes on.
What the Butter, Sugar, and Fruit Each Bring to the Pan
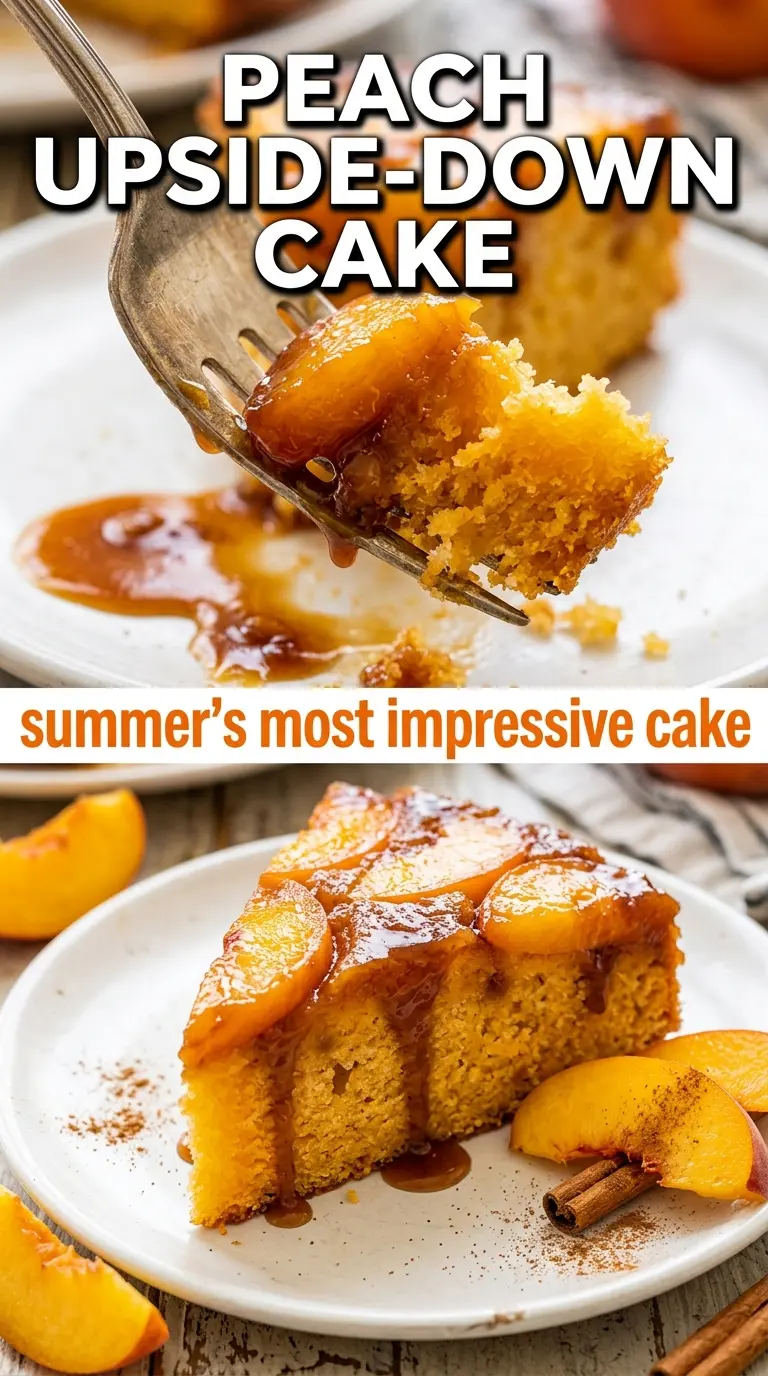
- Peaches — Use ripe peaches that still hold their shape when sliced. Very soft fruit can slump and disappear into the batter; firmer ripe peaches keep their shape and give you those neat concentric rings. If your peaches are a little underripe, let them sit on the counter for a day or two first.
- Brown sugar — This is what turns into the caramel layer under the fruit. Packed brown sugar melts into a deeper, richer glaze than white sugar would, and it’s the ingredient that gives the cake its sticky top. Light or dark brown sugar both work; dark brown sugar will taste a little more molasses-forward.
- Butter — The melted butter under the sugar keeps the topping from hardening into a brittle layer and gives the peaches a glossy finish. In the cake batter, softened butter is what makes the crumb tender. Don’t swap in oil for the topping; it won’t give you the same caramel texture.
- Sour cream or whole milk — Whole milk makes a lighter cake, while sour cream gives you a tighter, richer crumb that holds up especially well under juicy fruit. If you want the cleanest slice, use sour cream. If all you have is milk, the cake will still bake up soft and moist.
Building the Batter Without Deflating the Fruit Layer
Set the caramel base first
Melt the butter in the pan in the oven, then swirl it so the bottom is coated edge to edge. Sprinkle the brown sugar and cinnamon evenly over the butter while it’s hot; that helps the sugar start dissolving instead of sitting in dry pockets. If the sugar lands unevenly, you’ll get bare spots after the flip.
Arrange the peaches with intention
Lay the peach slices in overlapping circles, starting at the outside and working toward the center. Press them down lightly so they nest into the sugar, but don’t pack them so tightly that the topping can’t bubble between slices. A tight, even layer gives you that dramatic pattern when the cake comes out of the pan.
Mix the batter just until it comes together
Cream the butter and sugar until it looks pale and fluffy, then add the eggs and vanilla. Alternate the dry ingredients and the milk or sour cream, mixing only until the flour disappears. If you overmix here, the cake turns dense and the top can sink unevenly over the fruit.
Pour gently and bake for the right finish
Spoon the batter over the peaches in dollops, then smooth it carefully so you don’t drag the fruit out of place. Bake until the top is golden and a toothpick comes out clean, and watch for the sides to pull away from the pan. If the center still looks wet but the edges are already browned, give it a few more minutes and cover loosely with foil only if needed.
Make It Dairy-Free
Use plant-based butter for both the topping and the batter, then swap the milk for an unsweetened non-dairy milk with a little body, like oat milk. The cake will still bake up tender, but the topping won’t taste quite as rich as it does with real butter.
Use Sour Cream for a Denser, Richer Crumb
Sour cream makes this cake tighter and more plush, which helps when the peaches are extra juicy. It also gives you cleaner slices after the flip. If you want a lighter texture, stick with whole milk instead.
Add a Little Extra Spice
A pinch of nutmeg or cardamom works well if you want the peaches to taste a little warmer and more dessert-like. Keep it subtle so the fruit still leads. Too much spice can muddy the caramel flavor instead of supporting it.
Storage and Reheating
- Refrigerator: Store covered for up to 4 days. The topping will soften a bit as it sits, but the flavor stays good.
- Freezer: Freeze individual slices tightly wrapped for up to 2 months. The fruit texture softens after thawing, so this is best for leftovers rather than a dessert you’re making ahead for presentation.
- Reheating: Warm slices in a 300°F oven until just heated through. The microwave works in a pinch, but it can make the caramel layer slippery and the crumb gummy.
Answers to the Questions Worth Asking
Peach Upside-Down Cake
Ingredients
Equipment
Method
- Preheat the oven to 350°F. Melt 1/3 cup butter in a 9-inch round cake pan or cast iron skillet in the oven, then swirl to coat.
- Sprinkle the brown sugar and cinnamon evenly over the melted butter. Set the pan aside while you prepare the peaches.
- Arrange peach slices in overlapping concentric circles over the brown sugar layer. Keep the pattern tight so the rings show when inverted.
- Beat the softened butter and granulated sugar until fluffy. Look for a lighter color and thicker texture.
- Add the eggs one at a time, then mix in the vanilla extract. Stop once the mixture looks smooth.
- Alternate mixing in the flour mixture and the milk (or sour cream). Mix just until no dry streaks remain, with a thick batter consistency.
- Pour the batter gently over the peach arrangement and smooth the top. Make sure peaches stay mostly in place beneath the batter.
- Bake at 350°F for 38-42 minutes, until a toothpick comes out clean and the cake pulls away from the sides. The top should be set and lightly golden.
- Cool the cake in the pan exactly 10 minutes. The caramel should look glossy while the cake firms up for flipping.
- Invert the cake onto a plate and serve warm. Carefully lift the pan to reveal the concentric amber-glazed peach rings.