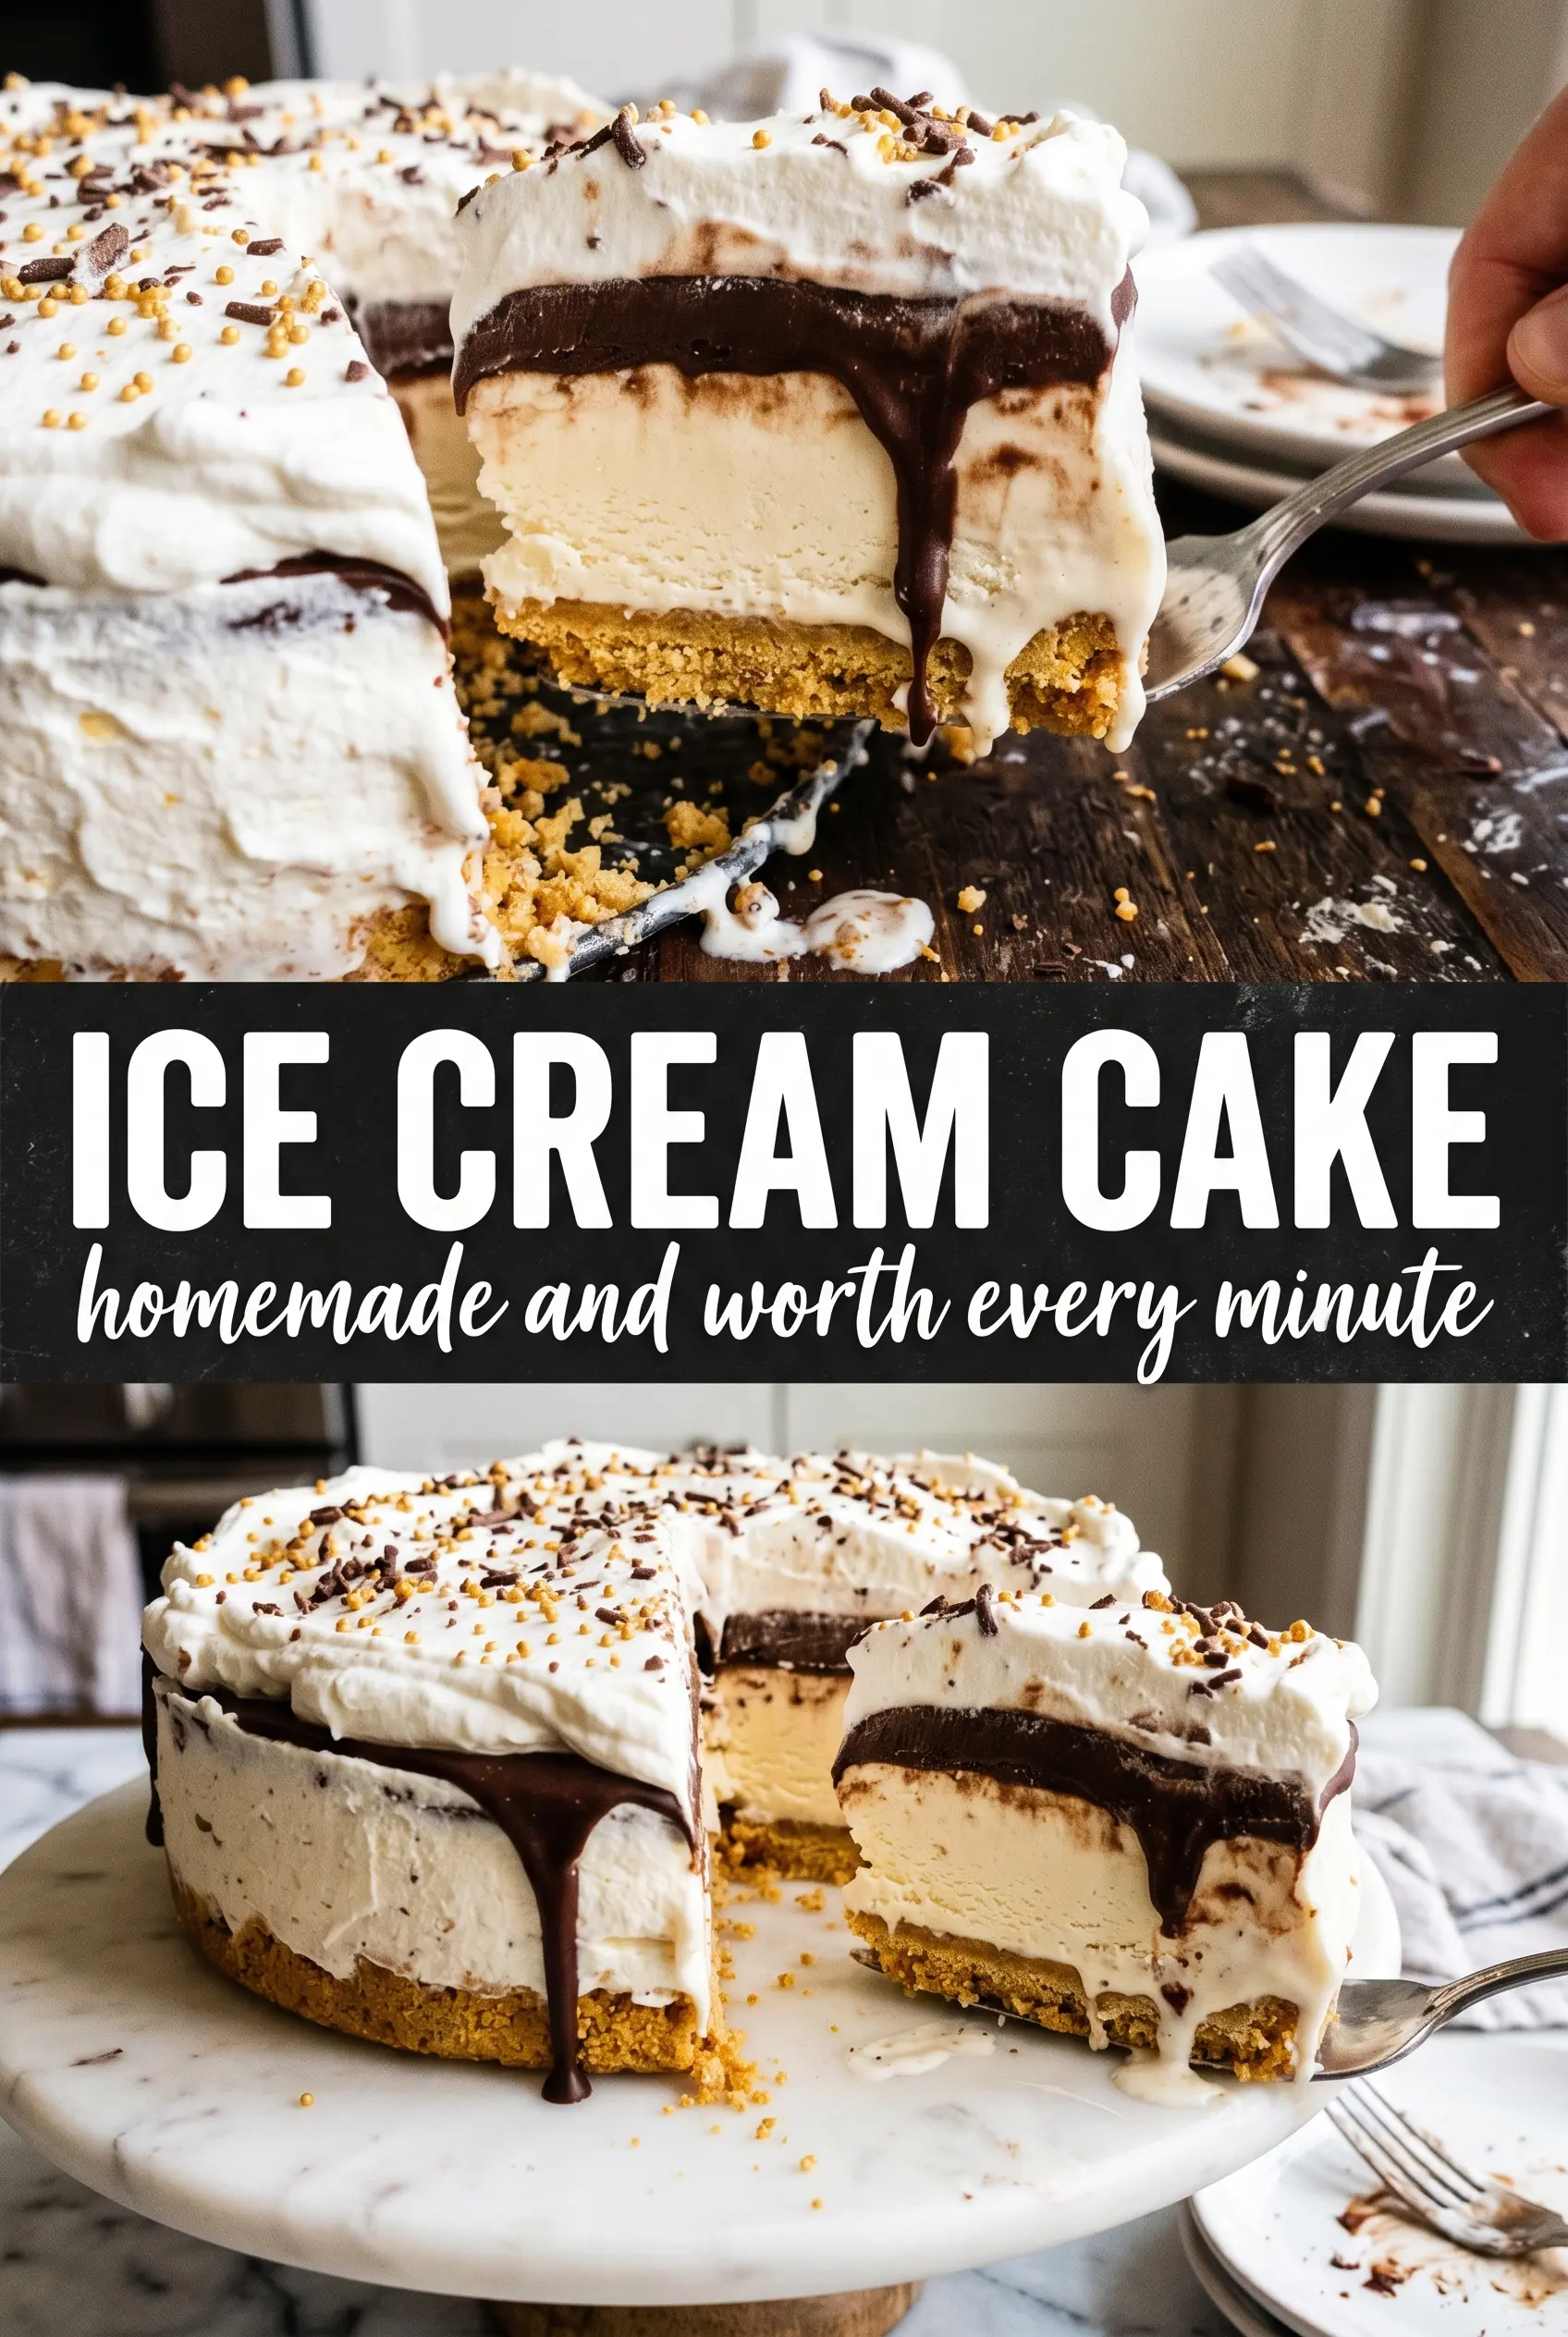
Layers of Oreo crust, vanilla ice cream, hot fudge, and strawberry ice cream make this ice cream cake a clean, old-school dessert that cuts like a dream when it’s built right. The cookie base stays sturdy, the fudge lands as a distinct ribbon instead of disappearing into the ice cream, and the whole cake slices into neat wedges that hold their shape long enough to get to the plate.
The trick is patience between layers. Each layer needs time to firm up before the next goes on, or you end up with streaks instead of defined layers. Slightly softened ice cream spreads smoothly without tearing the crust, and a springform pan makes the release much less stressful when it’s time to serve.
Below you’ll find the details that keep the layers sharp, plus a few smart swaps if you want to change the flavor or make the cake ahead for a birthday or party.
The layers froze up cleanly and the fudge stayed in its own stripe instead of mixing into the vanilla. I used the hot knife trick and the slices came out looking bakery neat.
Save this Oreo ice cream cake for birthdays when you want sharp layers, a fudge ribbon, and an easy no-bake dessert that slices cleanly.
The Part That Keeps the Layers from Sliding
An ice cream cake falls apart when each layer is added too quickly. The base needs a short freeze so it can support the vanilla, and the vanilla needs to be firm before the fudge goes on or the sauce sinks straight through. Once the fudge is cool but still pourable, it settles into a clean stripe instead of melting the layer below it.
Softened ice cream matters here. If it’s rock hard, you’ll tear up the crust and leave gaps in the pan. If it’s melted too far, the cake freezes with icy pockets and the layers never look sharp. Aim for ice cream that yields easily to a spatula but still holds its shape when spread.
What Each Ingredient Is Doing in This Cake
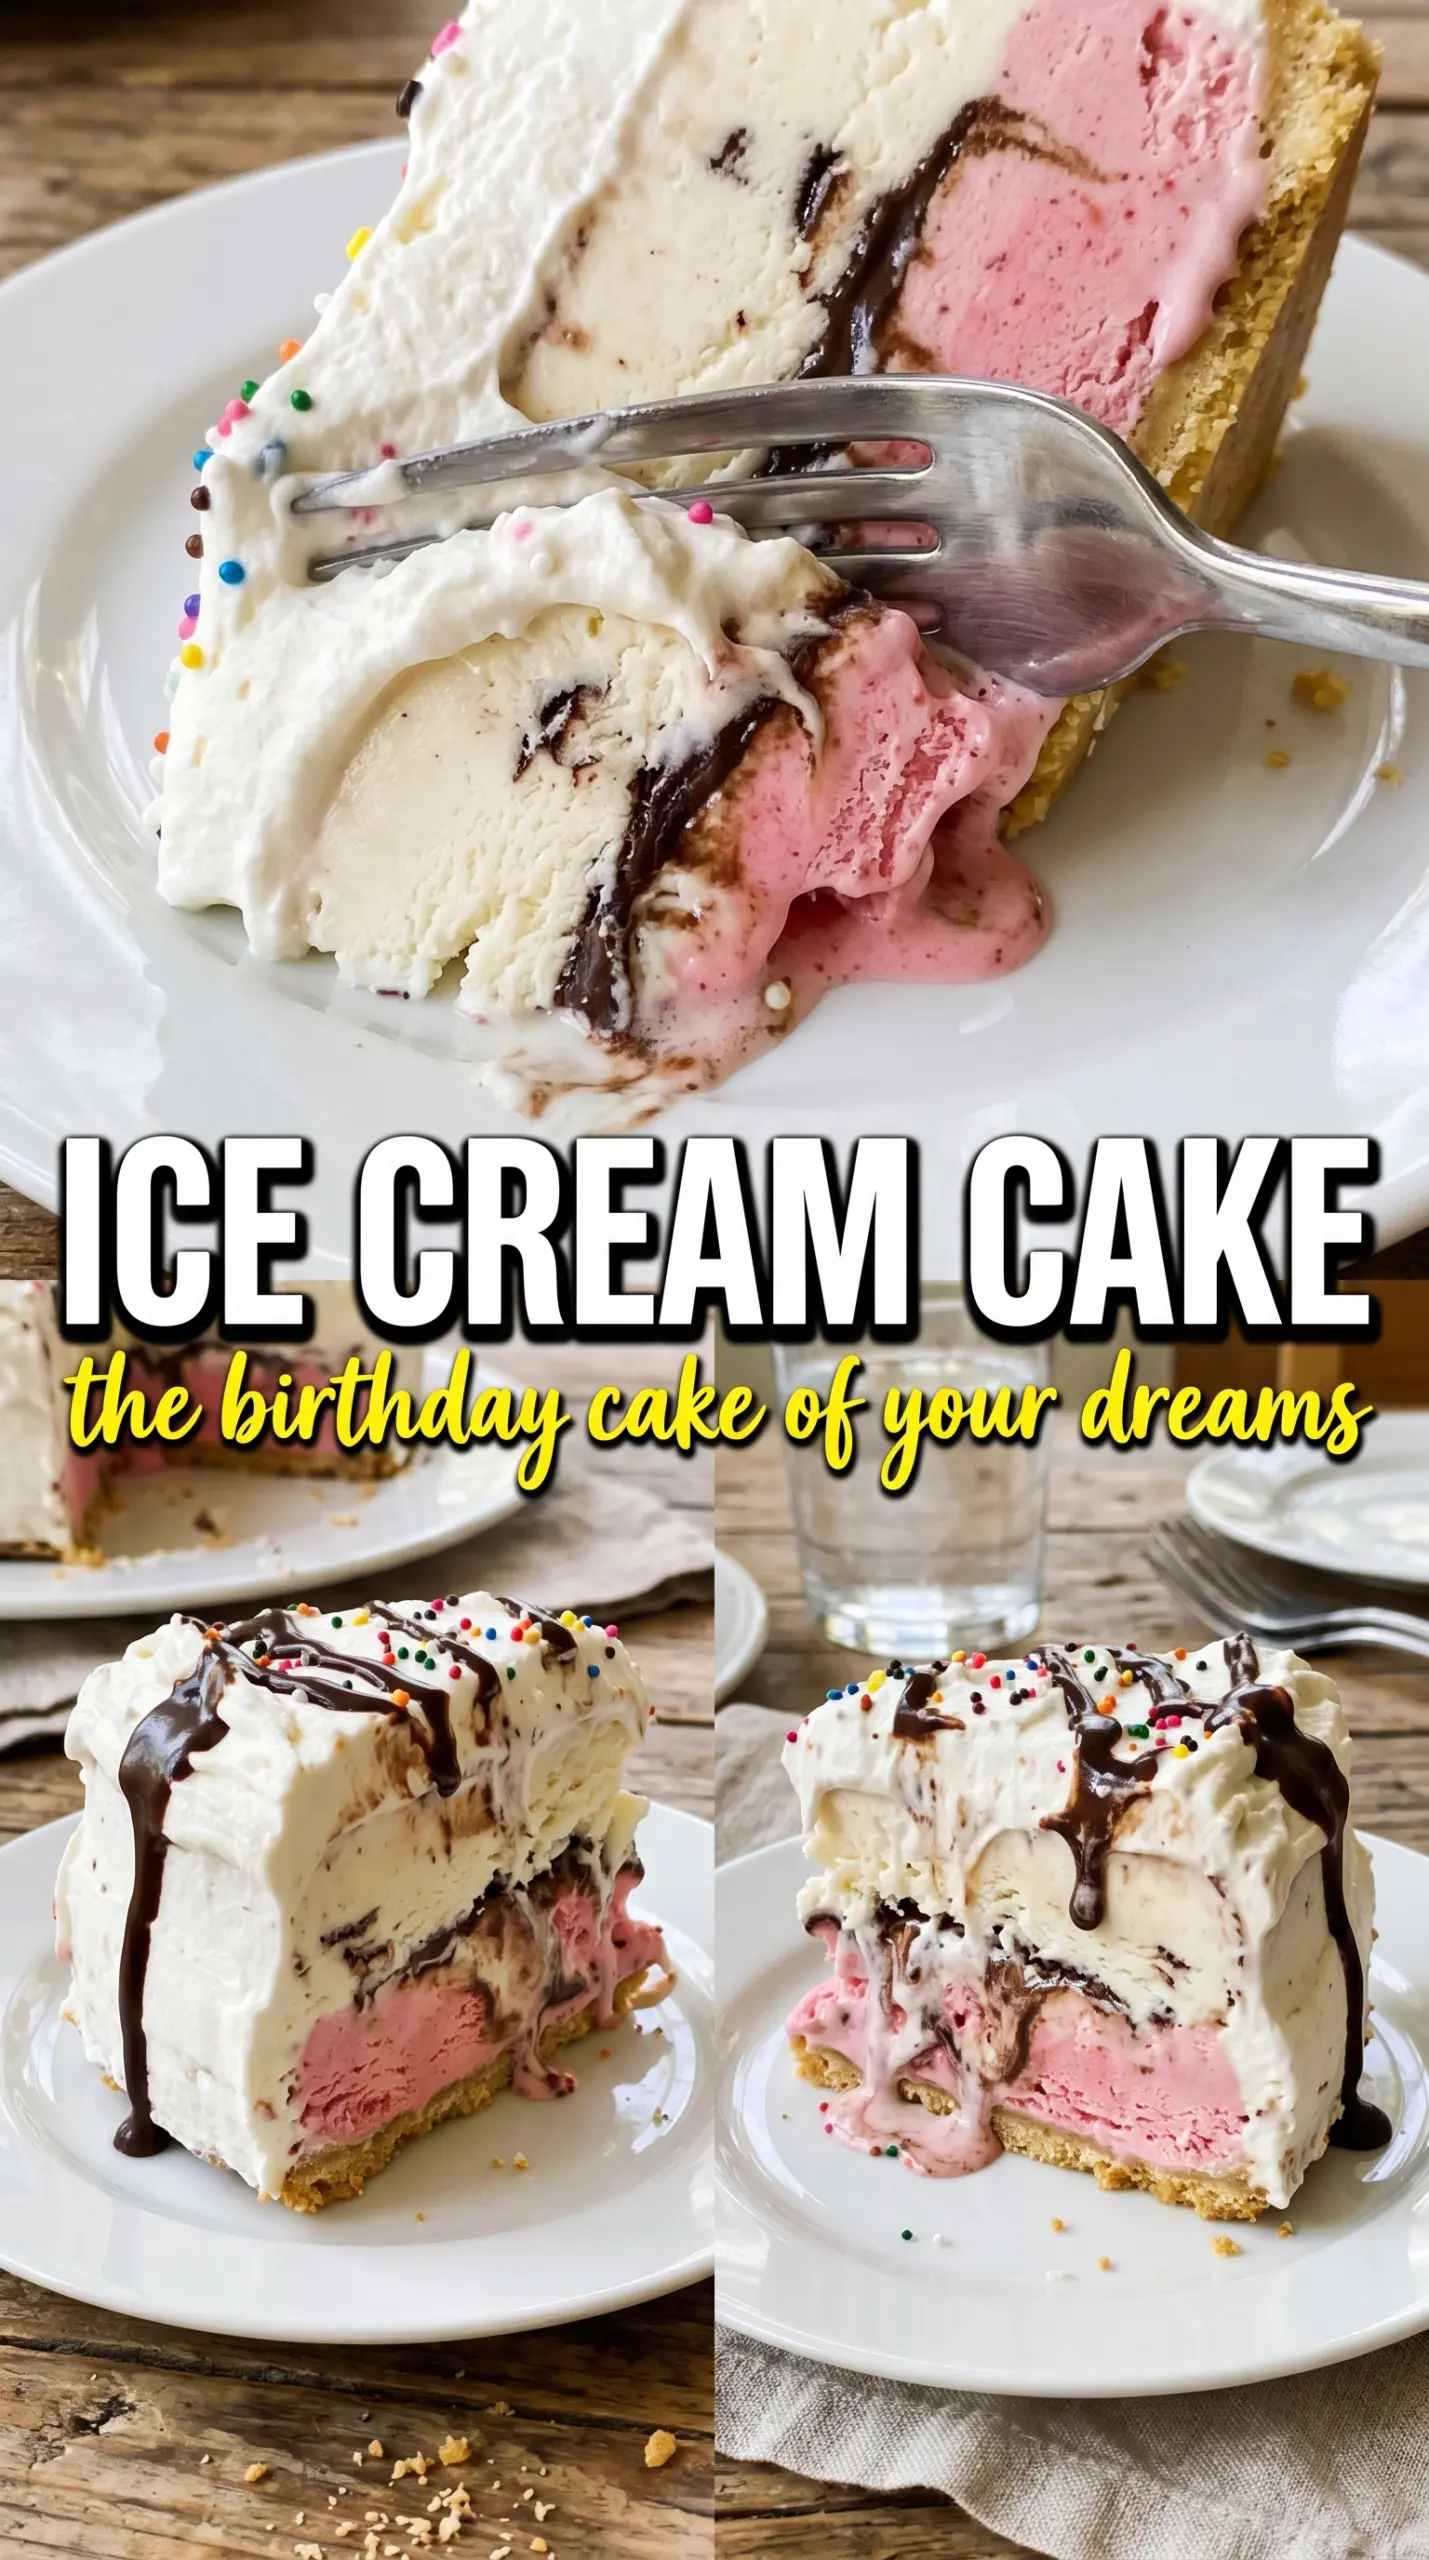
- Oreo cookies — They make the crust without baking, and the chocolate flavor gives the bottom layer enough contrast to stand up to the sweet ice cream. Crush them fine enough that the crust packs tightly, but leave a few small crumbs for texture.
- Butter — This is what turns cookie crumbs into a sliceable base. Melted butter is enough here; there’s no need for anything fancier, but the mixture has to be pressed firmly or the crust will crumble when you cut the first slice.
- Vanilla ice cream — This gives the cake a creamy middle layer that balances the strawberry and fudge. A full-fat ice cream spreads best and freezes into a cleaner line than a lighter carton, which can get icy.
- Strawberry ice cream — This adds color and a bright flavor that cuts through the chocolate crust. If you swap in another flavor, pick one that freezes firm; anything too soft or mix-in heavy can make slicing messy.
- Hot fudge sauce — Fudge gives you that classic ribbon through the center, but it needs to cool before you pour it. Hot fudge that’s too warm will melt the vanilla layer and blur the line between the two.
- Whipped topping or stabilized whipped cream — This is the finish that makes the cake look party-ready and adds a soft, creamy top. Stabilized whipped cream holds the best shape if the cake sits out a few minutes before serving.
Building the Cake Without Melting the Layers
Pressing the Crust
Mix the crushed Oreos with melted butter until every crumb looks damp, then press the mixture firmly into the bottom of a springform pan. Use the bottom of a measuring cup to compact it evenly so the crust holds together when you slice through it later. A loose crust is the most common reason the first piece breaks apart at the bottom.
Spreading the First Ice Cream Layer
Scoop the vanilla ice cream while it’s softened enough to spread but not soupy, then smooth it over the crust in an even layer. Work quickly so it doesn’t melt into the cookie base, and freeze it until the surface feels firm to the touch. If the vanilla is still soft when the fudge goes on, the layers will blur together instead of staying distinct.
Adding the Fudge Ribbon
Let the hot fudge cool slightly before drizzling it over the vanilla layer. It should flow easily from the spoon but not be hot enough to sink into the ice cream. Freeze again for a short stretch so the fudge sets, which keeps the strawberry layer from pulling it upward as you spread.
Finishing and Freezing Solid
Spread the strawberry ice cream over the set fudge layer, smooth the top, and cover the pan before freezing for several hours or overnight. The top needs enough time to get fully firm so the cake releases cleanly from the pan and slices without slumping. Before serving, run a warm knife around the edge, then work quickly once the cake is out of the springform.
Ways to Change the Cake Without Losing the Clean Slices
Make it peanut butter and chocolate
Swap the strawberry ice cream for chocolate and add a thin layer of peanut butter over the fudge before freezing. The peanut butter adds richness and a salty edge, but keep the layer thin so it doesn’t make slicing greasy.
Use gluten-free cookies for the crust
A gluten-free chocolate sandwich cookie works well here as long as it crushes into fine crumbs and binds with the butter the same way. The texture stays close to the original, so the swap is easy and the cake still releases cleanly.
Make it dairy-free
Use dairy-free ice cream, plant-based butter, and a nondairy whipped topping. The flavor still works, but dairy-free ice cream can soften faster, so freeze each layer a little longer before adding the next one.
Storage and Reheating
- Refrigerator: Not recommended; the cake will soften quickly and lose its clean layers.
- Freezer: Wrap tightly and freeze for up to 1 week for the best texture. After that, the crust can get stale and the ice cream may pick up freezer flavor.
- Reheating: Don’t reheat it. For the cleanest slice, let it sit at room temperature for 5 to 10 minutes, then cut with a knife dipped in hot water and wiped dry between slices.
Answers to the Questions Worth Asking
Ice Cream Cake
Ingredients
Equipment
Method
- Mix crushed Oreos with melted butter until the crumbs look evenly coated, then press firmly into the bottom of a 9-inch springform pan. Freeze for 15 minutes until set and firm (watch for a solid, packed crust).
- Spread the vanilla ice cream in an even layer over the Oreo crust, smoothing the top with the back of a spoon. Freeze for 1 hour until firm enough to hold its shape (it should look matte and not squish).
- Drizzle the slightly cooled hot fudge sauce over the vanilla layer in a thin ribbon. Freeze for 15 minutes until the fudge is set (you should see it hold its streaks).
- Spread the strawberry ice cream over the fudge layer and smooth the top, keeping the surface even. Cover with plastic wrap and freeze for at least 4 hours or overnight until fully firm (no soft spots when pressed lightly).
- Run a warm knife around the edge, then release the springform and transfer the cake to a serving plate. Wipe the knife clean between passes for a sharp edge.
- Pipe whipped cream swirls around the top edge, then scatter rainbow or patriotic sprinkles across the center. Slice with a hot knife, serve immediately, and keep slices clean for the best layered look.