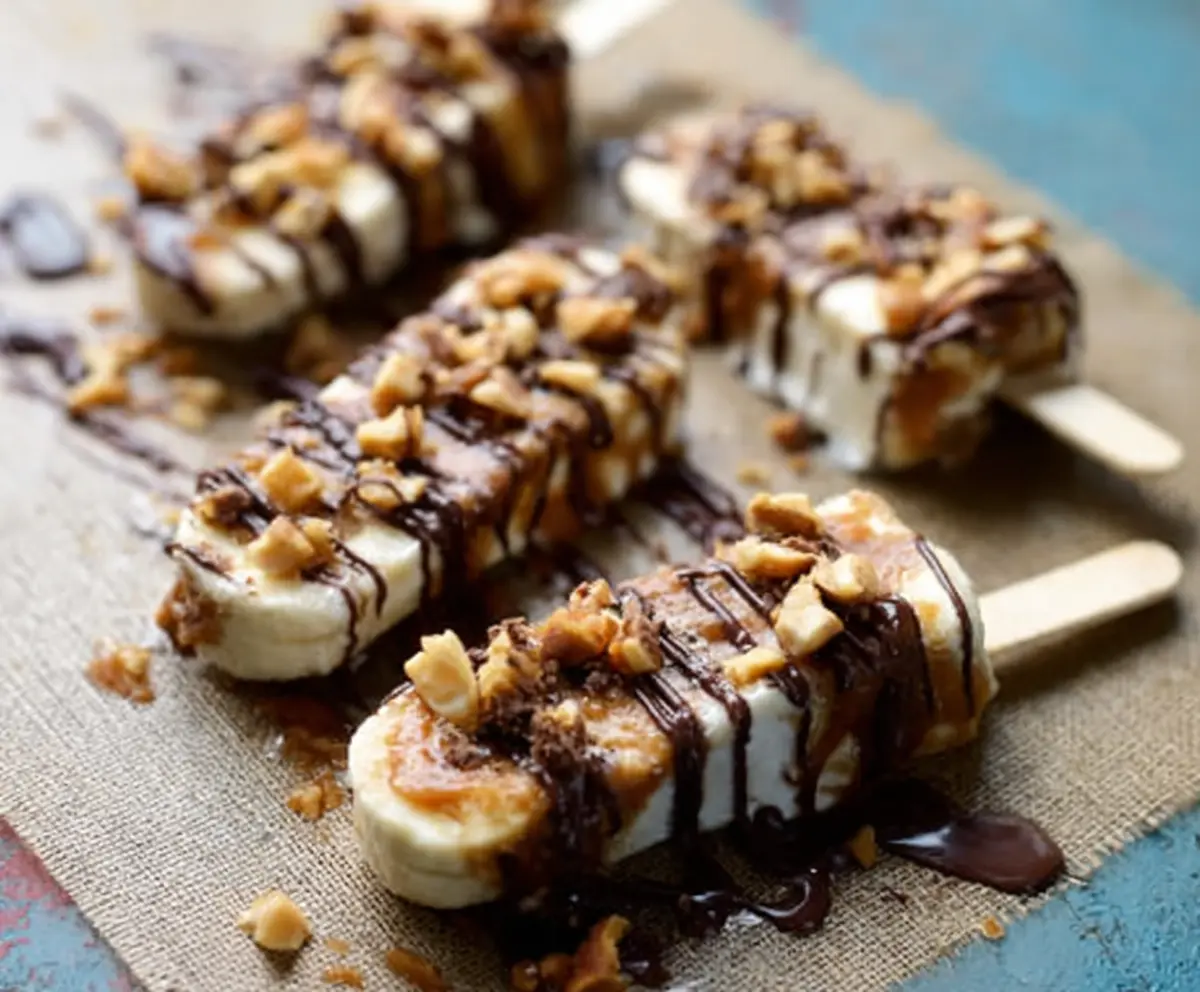
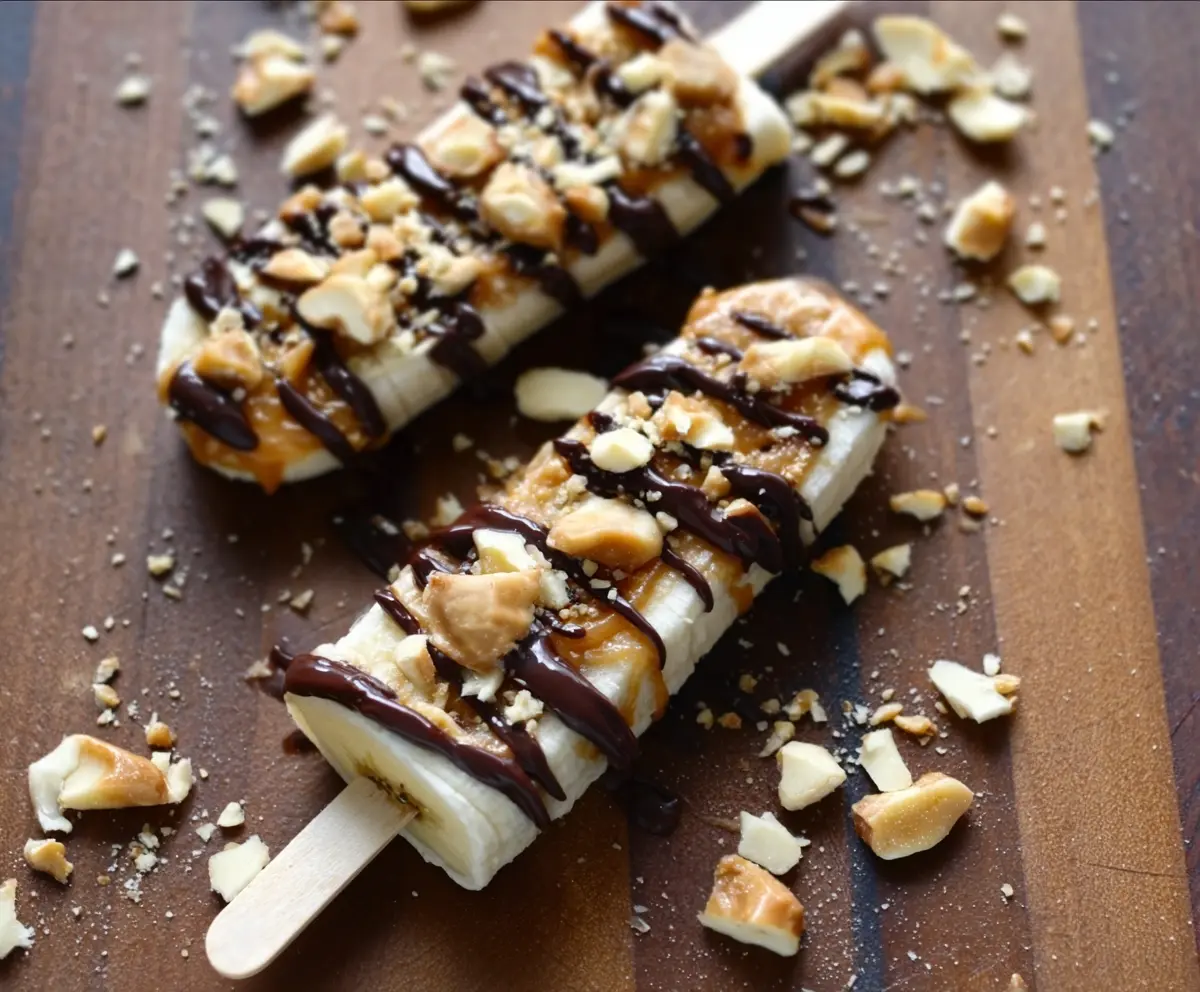
Frozen Banana Snickers is a fun and tasty treat that brings together the creaminess of frozen banana, the crunch of peanuts, and the sweet, chocolatey goodness inspired by a classic Snickers bar. It’s like a little dessert adventure that’s cool, refreshing, and just the right amount of sweet and nutty.
I love making these because they’re super simple to put together, and they feel like a special treat without any fuss. I usually keep some frozen banana slices ready, then just add chopped peanuts, a drizzle of chocolate, and maybe a swirl of caramel if I’m feeling fancy. It’s a nice way to enjoy dessert without reaching for something too heavy.
The best part is how versatile Frozen Banana Snickers can be — perfect for a quick afternoon pick-me-up or a light, fun dessert after dinner. Whenever I make them, friends always ask for the recipe, and it’s so cool to share something that tastes so good but doesn’t take forever to make! Plus, it’s a great way to use up ripe bananas and make them exciting again.
Key Ingredients & Substitutions
Bananas: Use ripe bananas for natural sweetness and creamy texture when frozen. If you want a softer bite, let them ripen a bit more before slicing.
Caramel Sauce: Store-bought works fine, but homemade caramel adds extra richness. For a dairy-free version, try coconut caramel or date syrup.
Peanuts: Roasted, unsalted peanuts give a nice crunch and flavor. You can swap them for almonds, cashews, or even sunflower seeds if allergic.
Chocolate Chips: Use dark or milk chocolate depending on your preference. For a vegan option, pick dairy-free chocolate chips or melt dark chocolate bars.
Coconut Oil or Butter: This helps the chocolate melt smoothly and sets nicely. Coconut oil adds a light coconut hint, while butter offers creaminess.
How Do You Freeze Bananas Without Them Getting Too Hard or Watery?
Freezing bananas correctly makes all the difference. Here’s what works best:
- Slice bananas evenly to ensure they freeze and thaw uniformly.
- Freeze in a single layer on parchment paper to avoid sticking together.
- Keep bananas completely frozen until ready to coat with caramel and chocolate to maintain firmness.
- Return finished bananas to the freezer after adding toppings to help chocolate and caramel set well.
- Let them thaw a minute before eating for a softer, creamier bite.
These steps help keep your Frozen Banana Snickers both tasty and easy to enjoy without melting mess or icy spots.
Equipment You’ll Need
- Parrboard-lined baking sheet or large plate – I use this to freeze the banana halves flat, so they don’t stick together.
- Wooden popsicle sticks – these make eating and handling the frozen bananas easy and mess-free.
- Microwave-safe bowl – perfect for melting the chocolate evenly and quickly.
- Spatula or spoon – for drizzling melted chocolate and caramel smoothly over the bananas.
- Freezer – essential for firming up the bananas and toppings before serving.
Flavor Variations & Add-Ins
- Try almond or cashew nuts instead of peanuts for a different crunch and flavor.
- Add a drizzle of white or dark chocolate over the top for a decorative touch.
- Use caramel sauce infused with sea salt for a salty-sweet twist.
- Mix in chopped pretzels or brownies for extra texture and flavor
Frozen Banana Snickers
Ingredients You’ll Need:
- 4 ripe bananas
- ½ cup caramel sauce (store-bought or homemade)
- ½ cup peanuts, chopped (preferably roasted and unsalted)
- ½ cup dark or milk chocolate chips
- 1 tablespoon coconut oil or butter (for melting chocolate)
- Wooden popsicle sticks
How Much Time Will You Need?
This recipe takes about 10 minutes to prepare plus at least 2 hours of freezing time to fully freeze the bananas. After drizzling and topping, allow another 15-20 minutes to set the chocolate and caramel before serving.
Step-by-Step Instructions:
1. Prepare the Bananas:
Peel the bananas and slice each one in half across the middle. Carefully insert a wooden popsicle stick into the cut end of each banana half so they’re easy to hold like a popsicle.
2. Freeze the Banana Halves:
Place the banana halves on a baking sheet or plate lined with parchment paper, making sure they do not touch each other. Freeze them for at least 2 hours, or until they are completely frozen solid.
3. Add Caramel Sauce:
Remove the frozen bananas from the freezer and drizzle each one with caramel sauce evenly over the surface.
4. Melt the Chocolate:
In a microwave-safe bowl, combine the chocolate chips and coconut oil or butter. Heat in 20-second bursts, stirring in between, until the chocolate is fully melted and smooth.
5. Drizzle Chocolate and Add Peanuts:
Drizzle the melted chocolate over the caramel-covered bananas. Quickly sprinkle the chopped peanuts on top before the chocolate hardens.
6. Final Freeze and Serve:
Return the bananas to the freezer for about 15-20 minutes so the chocolate and caramel firm up. Serve them chilled and enjoy your delicious Frozen Banana Snickers!
Can I Use Frozen Bananas for This Recipe?
It’s best to start with fresh ripe bananas that you freeze yourself for this recipe. Frozen bananas bought pre-frozen tend to clump together and can be mushy, making it harder to insert sticks and get a firm texture.
How Do I Store Leftover Frozen Banana Snickers?
Keep any leftovers in an airtight container or wrapped individually in plastic wrap in the freezer. They’re best enjoyed within 1-2 weeks for optimal freshness and texture.
Can I Substitute Caramel Sauce?
Absolutely! You can swap caramel sauce for chocolate syrup, peanut butter drizzle, or even a fruit jam if you want a different flavor twist. Just keep in mind the consistency so it sets well on the frozen bananas.
What If I Don’t Have Popsicle Sticks?
If you don’t have wooden sticks, you can use sturdy straws or simply serve the banana halves on a plate and eat with a fork. Just be careful as it’s a bit messier without the sticks.